PLUG Tools
PLUG Tools
Cell Tools
The Cell Tools Widget will be your primary tool for creating your individual Cells (Levels).
It holds all of the submodules necessary to create Cell Blocks, Openings, Doors, and Blocks, as well as the option to adjust the Opening Settings and the Cell Block settings.
For ease of use, the Lights and Spawners Widgets have been added to this module to aid in your level design.
The Primary Widgets have utility buttons at the top of the panel.
The Refresh Widget button will reset the entire Widget, and will also clean up any temporary assets in your level that were created by this Widget.
The Discord button will take you to the PLUG Discord server. Feel free to ask questions, offer feedback, or just hang out.
The Documentation button will take you... well.. here.
Utility

Cell Block Creator
The Cell Block is the centerpiece of PLUG, holding all of the data, connections, and spawners you'll need to procedurally build your dungeons. A single Cell Block is placed in all of the Cells (Levels) you'd like to include in a Dungeon and, when combined with the other processes outlined, will allow the Dungeon Builder to create a new, randomized dungeon with consistent pathing using the Cells you've created. This Widget allows you to create a new Cell Block, or place a preexisting one.
It can only be accessed when inside of a Level that does not currently contain a Cell Block. Simply have the Cell Tools Widget open after creating a new Level, or open an existing one that does not have a Cell Block, and the Cell Tools Widget will automatically switch to this mode.
Upon creating a new Level with the Cell Tools widget open, you'll be greeted by a familiar image.
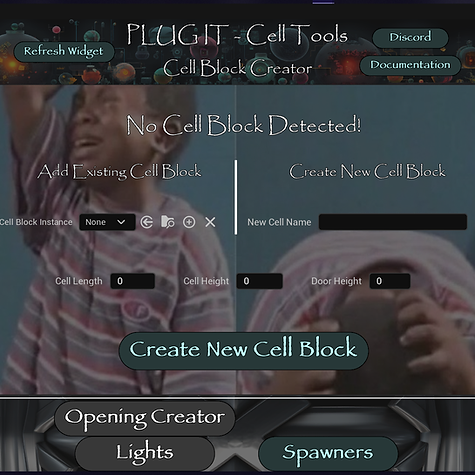
The left side of the panel allows you to select a Cell Block that you've already created to place. Once an option is selected the properties below will change to display the measurements of the selected Cell Block.
To place, select a Cell Block then click the Place button below.
The right side of the panel allows you to type in the Name for a new Cell Block. Enter this, and then input the measurements you'd like for the Cell Block below. These can be changed later.
Once finished, click the Create New Cell Block button.
Once a Cell Block is created, the Cell Tools Widget will automatically switch to the Opening Creator mode. This mode allows you to change the scaling of your Cell Block, as well as adjust the measurements you previously entered.
Its main purpose, however, is to specify which of the Connector Slots will be a Door (or Block) and which will be a Wall.
Opening Creator
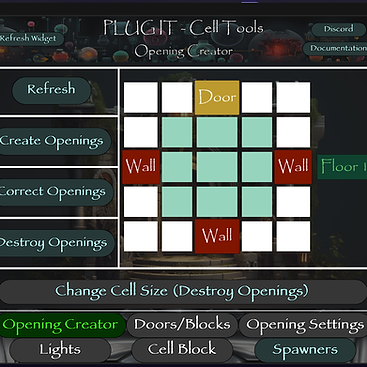
Cell Size, Openings, and Walls
The Cell Block will default to a 1x1x1 size. This Cell Size is multiplied by the measurements you previously entered (X and Y by Cell Length, Z by Cell Height).
Furthermore, for every 1 length of X and Y a Connector Slot is created in the center, which will later allow you to place a Wall or Opening.
Openings (yellow) allow this Cell to connect to other Cells at this point when building a Dungeon.
Walls (red) prevent any connections from ever happening at this location within this Cell.


Changing Cell and Base Size
To change the Size of your Cell Block, select the Change Cell Size button at the bottom. Be aware that this will destroy any currently existing Openings and Walls in your Cell, including their settings. You will need to confirm the Destroy to continue. To cancel, click the Refresh button at the top.
After confirming, you'll be presented with a new set of parameters to adjust. These will adjust the size of your Cell Block in real-time and will also update the Cell Map.
If you'd like to adjust the initial measurements we entered when creating the Cell Block, select the Change Base Size button. Beware, these settings affect EVERY Cell that you've created using this Cell Block, so adjust with intent.
Once you're satisfied with the adjustments, click the button on the right (with the warning). The Widget will automatically select your Cell Block in the Editor, and wait for you to Apply Instance Changes to the Blueprint.
One final note, for every 1 unit of Cell Z a new Floor will be created. You can switch between the Floors you've created using the buttons on the right.
Creating Openings
Now that we've finalized the size of our Cell Block, we can begin placing our Openings and Walls. It's as easy as clicking the Create Openings button on the left.
But wait! Unless you want all of your Connectors to be Doors (ideal for a high success rate), we'll need to determine which of the Connector Slots will be a Door or Wall. This is also very straightforward. Clicking on the Blue Slot buttons on the Grid Map will toggle between Door and Wall.
If after creating Openings you decide you'd like to change them, you can simply click the corresponding Grid Map button to toggle it, and then select Create Openings again. This will only replace the slot that was changed, leaving your other settings intact. The changed slot will, however, lose all of its settings and be recreated.
Creating or Correcting Openings will also automatically rename your Cell Block to the name of your Level.
Correcting and Destroying Openings
If the Openings within your Cell are accidentally moved from their original location (required for the Dungeon to succeed), you can reset them to the correct positions using the Correct Openings button.
This will also automatically rename your Cell Block to the name of your Level.
This also allows you to compensate for Door Height adjustments. If you add Openings to a Cell Block and then change the Base Door Height, the Openings will not update to this new value. Selecting the Correct Openings button will correct this, however.
If you'd like to remove the Openings you've created, simply select the Destroy Openings button. This will also need to be confirmed before completing.
Door/Block Creator
The Door/Block Creator allows you to create and adjust your Door and Block Blueprints, which we will later attach to the Openings.
It has two modes, Door and Block, for creating each respective Blueprint, and defaults to Door Mode. You can switch modes by clicking the Door and Block buttons at the top, and this can only be done from Create Mode.
The first step in this process is to create or select a Blueprint, which we can do on the Create page.

Creating Doors and Blocks
The Folder button will take you to the default folder your Doors and Blocks will be stored in, located in the PLUG/Openings folder.
The Selected button will use the asset you have selected in the Content Browser (as long as it is a Door or Block Blueprint and you are in the respective mode).
The New button allows you to create a new Blueprint based on the mode you are currently in. Before clicking this, be sure to enter a Name for your Blueprint below, and optionally a Subfolder you'd like it to be saved to.
The Clear button will clear the currently selected Blueprint.
Once a valid Blueprint is selected, a new button on the left will appear, Set.
Setting Doors and Blocks
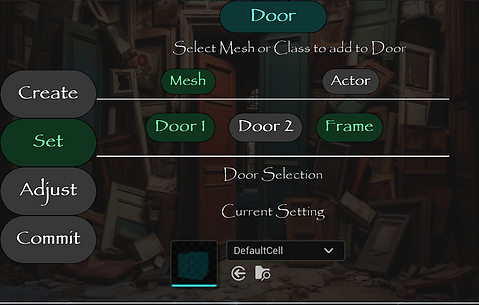
Upon entering Set Mode, you'll see this page.
For this example we'll go through the workflow of using a Mesh, but the process for using an Actor is exactly the same. To switch modes, simply click on the desired button.
For each Door, there are three placeable options: 2 Door Meshes (or Actors), and a Frame Mesh/Actor. Door 2 and Frame are optional, but an option for Door 1 MUST be selected to continue.
If the option currently has a valid Mesh or Actor, the button will turn green.
We'll be able to adjust their positions in a moment but, for now, select all of the options you'd like, minimally Door 1, which will unlock the Adjust Mode.
Adjusting Doors and Blocks
Once your Meshes or Actors have been set, the Adjust Mode becomes available.
While it may look packed, most of the menus here can be collapsed so you can focus only on the settings you're currently working on.


The Adjust Section of this panel allows you to adjust the Transforms for your selected Meshes/Actors, as well as enable a random 180 rotation (which will be previewed when enabled).
The Main Transform affects the Door as a whole, while the Door options only affect those specific selections.
The Boxes Section allows you to adjust the sizes of the built-in boxes. Specifically, of the Door Overlap Box (for opening the Door when a Pawn is overlapping), and the Spawn Block Box (to prevent Spawners from covering the Opening).


Animating Doors
By clicking the Animate button in the bottom right of the Door/Block Creator, you'll gain access to the Animate Panel.
Here, you can allow the Door to automatically open when a Pawn overlaps the Door Overlap Box by enabling the Animate checkbox.
If enabled and a Pawn overlaps the box, the Door 1 and Door 2 selections will animate from their Main Transforms to their Animation Transforms, over the course of time you set here (in seconds).
You can visualize the animation by clicking the Test Animation button. Clicking it a second time will reset the Door to its original (Main Transform) position.
Blocks
Before continuing to the final step, we'll cover Blocks.
Creating a Block follows the same exact procedure as creating a Door, with the notable exceptions that Blocks cannot animate, and therefore do not have an Animate Panel, and they are limited to 1 Mesh or Actor selection.
Opening Settings
Once we've created Doors and Blocks, we can place them using the Opening Settings Widget.
This widget also has a Door and Block Mode, as well as additional Modes.
Single Mode allows you to select a single Opening to adjust. Clicking an Opening (yellow) on the Map above these buttons will switch you to Single Mode with that Opening as your Selected Opening.

Floor Mode allows you to adjust every Opening on the current Floor. You can change Floors using the buttons to the right of the Map.
Global Mode allows you to adjust every Opening in your Cell at once.
Be sure to select your Mode before making adjustments, or these changes will not propagate to the other Openings.
Door Settings

With our Mode selection made, we can now add Doors to our Openings.
You can select between Single, Random, and Random Weighted for your Selection Type. If selecting Random Weighted, be sure to enter a matching Door Selection Weight for each of your Door Options. They do not need to add up to 100. As long as they are not 0, the system will automatically conform them.
There's also an option to offset the Door on the Opening.
The final setting here is the Door Priority.
While a Block is placed at EACH non-connected Opening, only 1 Door is placed per connected Opening, and the other Opening is destroyed.
When the Dungeon is placing Doors at each Opening along the Path, each Opening will check it's opposing/connected Opening before finalizing. If the opposing Opening has a higher Door Priority, the remaining Opening will copy that Opening's settings before destroying it. This allows you to guarantee that a certain type of Door will always spawn, with a specific orientation, regardless of where it is placed in the Dungeon or what it is connected to.
There is also a fourth, None, option for Selection Type. This is primarily to access the Spawn Block Extent without having a Door or Block placed. In situations where you don't need a physical Door or Block, but you do need to keep the Opening free of spawned objects.
Block Settings
The Block Settings are exactly the same as the Door Settings, but with an additional option, Spawner Config.
The Spawners are covered in detail on that page but to summarize, you are able to take a Spawner Config (preset) that you've made and use it as a Door Block. A grouping of Trees to block a Forest path, or a group of rocks spawned to close off an Opening to a Cave, for example.
When a Spawner Config is selected, a Test Spawn button will appear on the right that allows you to see what the spawn will look like. Clicking the button again will remove the spawn.
Cell Block
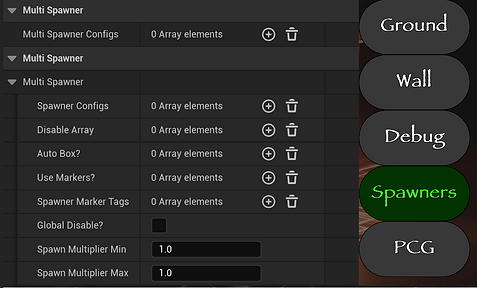
The Cell Block Mode contains multiple submodes: Ground, Wall, Debug, Spawners, and PCG.
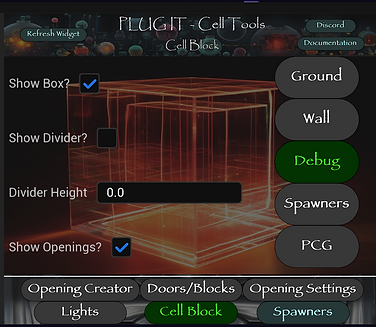
Ground

The Ground tab allows you to Spawn a mesh connected to the Cell Block to use as your ground.
You can select a Ground Mesh as well as a Material. If you'd like to use more than one material, assign them to the mesh directly and leave the Material selection here blank.
There is also a section for adjusting the Transform of the Ground, as well as if it will automatically scale with the Cell Size of your Cell Block.
The Wall tab has the same options as the Ground tab, with the exception of the Auto Scaling option. These will spawn at all locations marked as a Wall.
Wall

Debug

The Debug tab allows you to Show or Hide the Cell Block as well as its Openings.
There is also an option to Show/Hide a built in Divider, as well as adjust its height. A setting of 0 will be half of your Cell Height high (the halfway point of your Cell Block). This is purely for reference.
Each Cell Block can hold multiple MultiSpawner Configs (these are covered in the Spawners section).
There is also a built in MultiSpawner, meaning you can attach individual Spawner Configs.
Spawners are covered in depth in the Spawners section.
Spawners
PCG

The Cell Blocks can also hold PCG Graphs, which are initialized once the Dungeon finishes building.
There is a Single option, as well as an Array.